Outdoor DIY Mason Jars Chandelier


Some stylish and elegant chandeliers usually cost a fortune. However, if you want to have one in your own home, you don’t need to spend a hundred dollars or more. In fact, you can hang one in your house and would only shell out about $10.

This beautiful Mason jar DIY chandelier is sooo easy to make and needs only the basic materials. If you want to make one today don't wait and do it now!

How To Make A DIY Terrarium

How to Make a DIY Terrarium


Terrariums are not that complicated and expensive to make as some people might think. In fact, you can make your own using the simplest materials. Nicole Balch of MakingItLovely.com shares to us how to make a very simple terrarium.

It’s a refreshing sight to see a terrarium inside our homes. The green leaves, small flowers, and patches of dirt all make for a very beautiful DIY terrarium.

Beautiful And Artsy DIY Firefly Lamp


Want a DIY project to beautify your room with wonderful bursts of light? Here’s a tutorial which would really make you excited – a firefly lamp made from used milk tin cans.

The materials can be easily be found around your home, and this amazing lampproject can be made in a short span of time.

DIY Lamp Shade Made From Soda Top Tabs

DIY Lamp Shade Made From Soda Top Tabs

This is one awesome DIY project – an amazing lamp shade made from soda top tabs. You will need a lot of these soda top tabs but the finished project looks awesome and cool. This is very nice to display in your room or in your house’s general living space.


Remove the tab from the can by bending it back and forth until the metal fatigues and breaks.
If you want to estimate the number of tabs you'll need beforehand, here are a couple of rules of thumb:
For each row of mail, including the top and bottom hoops, you will need 4.857 tabs for every inch of shade diameter.
The top and bottom wire hoops, wrapped with tabs, add about 1/4" of height apiece.
Each row between the top and bottom hoops adds 1/2" inch of height.
Grab the tab across the short dimension with a pair of pliers, and use your thumb to bend it down about 20 degrees, as shown.
Tabs that will go in the top and bottom rows should be bent, but not cut (at least, not yet). So bend enough tabs for two rows of mail and set them aside before picking up your side-cutters.
Unplug the lamp, remove the bulb if one is present, and install the top lampshade hoop on the lamp.
Update: I use a pair of jeweler's pliers with a custom 3D-printed insert to bend each tab to exactly the same angle, which greatly improves the appearance of the finished mail. More details here.
Start with an uncut tab bent as in Step 2.
Set the tab on the top wire hoop, aligning the hoop with the bend. Apply finger pressure to continue the bend to about 90 degrees.
Insert a small flatblade screwdriver through both openings in the tab and apply leverage, as shown, to wrap the tab tightly around the wire hoop.
Check to see that the bent tab is secured to the hoop and will not "lift" off. Pinch troublesome tabs with needlenose pliers to secure them.
Continue adding tabs around the circumference of the top hoop, as shown in the previous step, until it is covered all the way 'round.
To accommodate the spokes attaching the hoop to its hub, remove an adjacent tab that has already been formed around the wire, and cut the finger loop so the spoke can be passed through it as shown.
Do not attempt to just work around the spokes by butting tabs close against them on either side. These tabs will be too far apart.
Set aside one row's worth of bent tabs. These will be used later to form the bottom hoop clips, and should not be cut yet.
Snip the remaining tabs, as shown, using a pair of side-cutters.
Continue adding tabs, as shown in the previous step, until you've completed the first row.
Keep adding rows until the shade is almost as tall as you want it to be.
The last row requires a bit of special treatment, so when you feel like you only need one more row of mail (not counting the bottom hoop), stop and proceed to the next step.
Remember that the bottom hoop will add about 1/4" to the height of the shade.
Tabs in the last row (again, not including the tabs that will be wrapped around the bottom hoop) have to be trimmed a bit, as shown.
Use your side cutters to make two cuts, one from each edge of the tab, about 1/8" up from the end, as shown.
Proceed to install the trimmed tabs in the last row of mail, as shown.
Proceeding as in steps 3 and 4, wrap the bottom hoop in uncut tabs to form "clips" that will link it to the mail above.
Once formed, remove the clips from the bottom hoop and, using your fingers, open each one to an angle of about 45 degrees.
Snip each tab with side cutters so that it can be incorporated into the mail.
Work the bottom hoop clips into the mail as usual; slip the cut loop of each clip through two adjacent tabs in the bottom row.
Insert the bottom shade hoop into the open clip, as shown.
Use strong finger pressure to close the clip around the hoop.
As before, make sure the hoop cannot "lift" out of the clip, and use pliers to secure troublesome clips.
Work all the way around the bottom hoop, installing clips as shown in the previous step.
Install the bulb and test the lamp.
You're done!

DIY: Rustic Linen Lampshades


Here's What You'll Need:
60 inches of thick, silver wire:
Wire cutters, pliers, strong tape.
2 yards of rough, organic linen sold by the yard:
A sturdy cotton thread
A white or black Hemma Cord Set
A bulb such as Schoolhouse Electric's A19 Silver Tip Bulb 60 Watt for $5.
At least 26 inches of cotton string: White Cotton 10-Ply Medium String

Instructions:
Cut the length of wire to 60 inches, make a circle by overlapping the ends just a bit and taping them together (you can use electrical, floral, or duct tape for this).
From your 2 yards of linen, you'll need about 64 inches: 60 to 61 inches to cover the circumference, and 2 to 3 inches for a healthy seam allowance. Moving slowly around the wire, hand-stitch the fabric until the two ends meet up.
Using a sewing machine, sew the hem (using the red thread) down the side (you can even go with a French seam if you're savvy with sewing), leaving about an inch open at the bottom for a little movement. Then finish the bottom of your fabric with another red hem.
Center your pendant cord (Ikea's has instructions for proper centering) and tie your string from the cord through the diameter of the circle, attaching on both sides. Hang the cord from a ceiling hook or as desired.

DIY Wine Barrel Mirror

DIY Wine Barrel Mirror

Even old wine barrels are still useful. The bottom part of wine barrels may be used as a mirror frame which will give a warm country old-style feel in any room. Simply find a wine barrel that has a complete bottom and is strong enough to support a large circular mirror. You may place this mirror in any wall but it would definitely add country charm in a bathroom no matter what interior decorating style you have.

DIY Decor With Paper Butterflies

DIY Nursery Decor With Paper Butterflies

Make your nursery a serene, inspiring and lovely place with this beautiful, flowing hanging décor. Babies love to look at different moving things; this improves their vision as well as their eye muscles. Hang this paper butterfly décor near his crib or at the window where it could catch a breeze. It is easy to make and very easy to set up. You may use materials that you can easily find at home. All you need is time; you can make this in just one weekend afternoon!

DIY DECOR - OLD WINDOW TABLE


How stylish can be an old junk window?The answer is -It can be amazing.This old white window is special part of this cozy and expensive looking living room.The extraordinaty ideas are not always good but this one is fine.Dark painted walls and those white furniture making an amazing contrast and makes the room looks vintage and trendy at the same time.Before you decide to try it be sure to check the window carefuly for broken and sharp parts.

Spray Bottles DIY Project

24 DIY Creative Ideas

Amazing idea what to do with your empty bottles.You can use wine or beer bottles.I try differnt colors but the best effect is made with white matt.If you don't wanna waste money and time don't try another color except white.For me beer bottles are better beacause they are smaller and their vision and transformation into vases is amazing.Wine bottles are too big.Enjoy this amazing vase idea!

Decorate your inexpensive blank vases with masking tape

24 DIY Creative Ideas

Decorate your inexpensive blank vases with masking tape. Use different colors to decorate it in your home theme.I try mine in pink color and it is absolutely sunning.Another idea is to make your coffee cups in the same way like your vase.All your guest will ask you where they can buy them! :)

DIY colorful garden spot.

21 DIY Ways To Edit Your Gardens

It is easy to create this colorful garden spot. You can find old tires almost everywhere for free.Buy some colored spray from the nearest dollar store and make an amazing garden. It is cool to make then in green color only and the plants inside will looks bigger and special.

Special DIY No Human on your garden

21 DIY Ways To Edit Your Gardens


Funny and unique idea for a company in your garden. Greate one of those and will have a special guest at your garden.If you change the plant in his head you can makes him looks amazing.

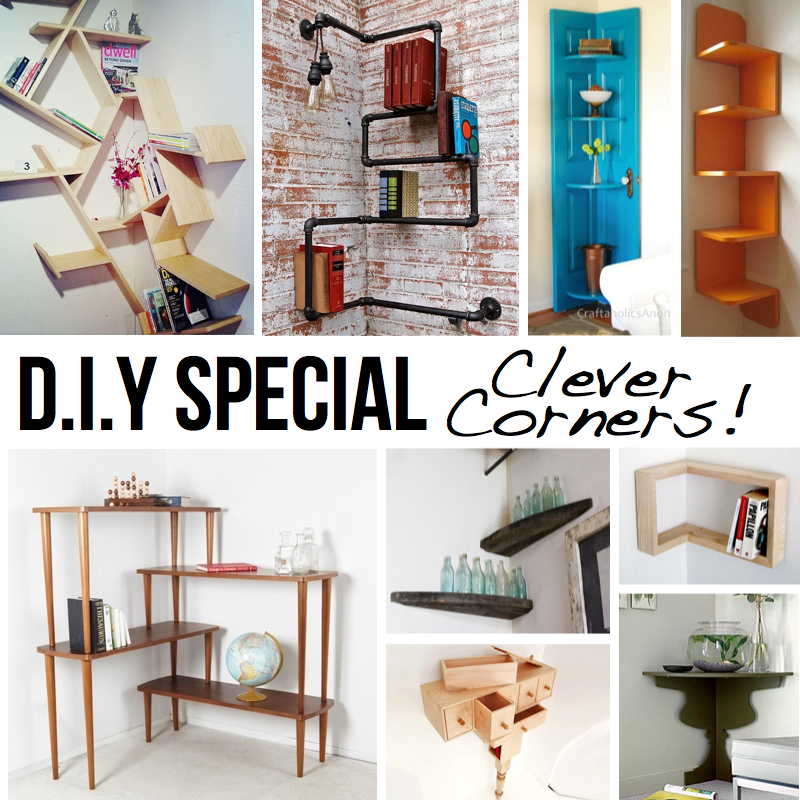
CLEVER CORNER D.I.Y IDEAS


Let creativity sprawl into each and every corner of your home – literally! Narrow corners are surprisingly often overseen and deemed ”impossible” to make something out of…Challenged by this ‘fact’ (further enforced by the lack of pre-made corner solutions from furniture retailers) I thought I’d gather a bunch of corner D.I.Y ideas proving the ‘corners are impossible’ notion wrong…

DIY HALLOWEEN SPIDER LANTERNS


Supplies -
  • mason jars (or old jars, washed and dried throughly)
  • faux spider web (available at any craft store)
  • plastic spiders
  • scissors
  • votives or flameless tealights
Remember how I said they were easy? As easy as it gets! Take a piece of faux spider web and cover the entire exterior of your jar. Once you have a placement that you like, trim it to size with your scissors. Attach a plastic spider or two, light a candle to place inside and voila!

DIY SNOW GLOBES


Supplies -
  • Clean jars with lids
  • Distilled water
  • Glycerin (available at most pharmacies)
  • Plastic or ceramic animals, trees and/or figurines
  • Tinsel glitter (mine is from Michaels)
  • Epoxy
  • Sand paper
DIY snow globes from The Sweetest Occasion | Photo by Alice G. Patterson
 DIY snow globes from The Sweetest Occasion | Photo by Alice G. Patterson

First up, make sure your jars are cleaned and dried thoroughly. Using your sandpaper, scuff up the underside of the lid and then attach your chosen figurines using a bit of epoxy. (You can find mini Christmas trees, plastic deer and other little characters at places like Hobby Lobby and Michaels.) Epoxy is going to be your best defense against water over time, but it can be a bit thick and stinky so be sure to use it according to the manufacturer’s instructions. Let the epoxy set completely and then fill your jar just short of full with distilled water. (You can get distilled water anywhere that you buy bottled water.)
DIY snow globes from The Sweetest Occasion | Photo by Alice G. Patterson
 DIY snow globes from The Sweetest Occasion | Photo by Alice G. Patterson

Next up, add the tiniest drop of glycerin to the water. If you add too much it’s going to make the water kind of thick and chunky so depending on the size of your jar, you’re likely not going to want more than one drop. (But don’t skip this step because the glycerin helps suspend the glitter in the water giving it that snowy effect.) Add your glitter to the jar, using more or less depending on how snowy you’d like your snow globe to appear. For best results, I found using tinsel glitter (which has larger glitter particles) worked best and gave the best snow-like look.
DIY snow globes from The Sweetest Occasion | Photo by Alice G. Patterson
 DIY snow globes from The Sweetest Occasion | Photo by Alice G. Patterson

And that’s about it! Insert your figurine and screw the lid on firmly and give it a good shake! I absolutely love how these turned out.

DIY terrarium with handmade mushrooms


I was addicted to making things out of sculpty clay. Recently I was at a friends house and she had handmade mushrooms and instantly I was reminded of all the clay bunnies and such that I had made as a kid and thought I could make those with the same clay. So I bought some for like a buck and made some mushrooms. It is really nice because the clay fires for 15 min in the oven and the mushroom maybe took 10 min to sculpt. I defiantly love a quick craft, it makes you feel so accomplished. Anyway here is a terrarium I made with moss from my back yard and a strawberry plant. I also added some budding sticks and of course some handmade mushrooms.

DIY Wallpaper Jars


Do you ever feel like you need some cute containers for q-tips, pens, and other odds and ends, but can't find exactly what you are looking for? I just realized that Anthropologie will send you wallpaper samples for free. So I gathered up some old glass cups and jars and covered them with wallpaper samples and other crafty things I had laying around (upholstery binding, ribbon and twin). I am obsessed with this Cole and Son Woods wallpaper so I was excited to have in my home in some way. Hope you enjoy!

DIY Doily Pumpkins


Doily Pumpkins:
Materials Needed: 1 Pumpkin, 4-6 Doilies (Vintage), Liquid Starch (Wal-Mart).
1. Pour starch into a bowl and dip doilies in the liquid starch
2. Place starched doilies on pumpkin and stretch until flat
3. Continue placing doilies until the pumpkin looks they way you want it too 
4. Let it dry over night
5. Wipe off excess starch.
6. Enjoy

DIY HANGING BOXWOOD PENDANT


Since my plywood Christmas tree project earlier this month, I’ve been on a bit of wood kick. Here is my latest contribution for Project Wedding; hanging modern pendants filled with fresh boxwood and a few sprigs of cheerful flowers. A grouping of these in varying sizes over a table setting would look cool, mixing minimalism with botanica.

DIY OMBRE TASSEL NECKLACE


You will need :

- White embroidery thread (100% cotton). 5 sets of 30 strands, each strand measuring 24" + 6 extra strands, each measuring about 4" + 5 extra strands, each measuring about 12"
- Scissors
- 4" long piece of cardboard (width doesn't matter)
- Dye (RIT dye is available at Joann’s or Michaels for around $2.50)
- Table salt
- A bucket of cold water
- Hot water
- Rubber gloves
- 5 small recipients, plastic or metal. If you can't find 5, one will be enough. They need to be bigger that your tassels (i.e. at least about 2" in height).
- Teaspoon or small syringe
- Chain necklace
- Needle


STEP 1 : MAKE FIVE TASSELS


1. Start with a set of 30 strands, each strand measuring 24". Wrap the thread tightly around the cardboard.

2. Gently pull the thread off the cardboard.

3. Tie the center with an extra piece of thread (about 4" long).

4. Cut the loop ends at both sides.

5. Pull down the fringe and shape your tassel.

6. Take an extra strand, about 12" long. Wrap it around your tassel (about 0.4" from the top), knot firmly and trim.

7. Trim to make the fringe on the bottom clean and straight. Notice that I haven't been very successful at that ;)

8. Cut the top thread (the one we used to tie the center at step 3).

9. Repeat all these steps to make 5 tassels. Dont' worry : once you've made the first one, you'll be able to whip a bunch out in no time.


STEP TWO : DYE THE TASSELS


If you have five recipients, you can dye your five tassels simultaneously. If you have only one recipient, just dye your tassels one by one.


1. Fill each of your recipients with about one table spoon of salt. Salt will help drive the dye onto the fabric.


2. Put your rubber gloves on, as you're going to pour the dye. If you have a syringe, you will be able to be very precise measuring the quantity of dye, but using a spoon will work very well too. I tried both and both went fine!


3. In the first recipient, pour just a few drops : about 0.5ml or 1/10 teaspoon. Pour dye in all recipients at an increasing progression, at a difference of about 0.5ml each time. The last recipient should have a quantity of dye of about half a teaspoon.


4. Now fill each recipient with hot water and wait a few seconds for the salt to dissolve in the water.


5. Place each tassel in each recipient, starting by the last recipient (the one that contains the largest quantity of dye) making sure the tassels are fully immersed.


3. Wait just a few seconds before starting to take out the lightest shade first. Wash out the excess dye in your bucket of cold water. Then take out the next tassel, and repeat until all five have been washed out. Let them dry (mine took about 3 hours to dry).


STEP THREE : MAKE THE NECKLACE


Insert an extra piece of embroidery thread through the eye of the needle, and tie it to the chain, or the clasp of the chain. Use the needle to guide the chain through the top loop of each tassel.


You are Done!

DIY Lipstick picture


The kiss is a symbol that’s as playful as it is romantic. We see its presence everywhere. From Dan Colen’s artwork to Erin Fetherston’s current collection, a kiss will never go out of style. Now it’s your turn to touch someone’s heart with DIY art.

If you’re like us, you’ve got oodles of lipsticks lying around in a variety of fun shades. So why not use them to make a Valentine for someone you adore? They say love is in the air…so hang it on the wall for all to see!


To create: Apply lipstick to your lips. We used an assortment from our favorite brands: Chanel, Dior, Estée Lauder and Maybelline. Kiss a piece of paper over and over until the color fades. Reapply if necessary or use a different shade and create layers of multi-colored smooches for your loved one. Finish off by placing your personalized artwork in a frame. P.S.- get creative with a cluster of frames in varying sizes.


If  you love, love… then you will fall for our newest jams! 
CLICK HERE for the P.S.- I made this..Playlist: Volume 4
 by The Jane Doze.


To create: Apply lipstick to your lips. We used an assortment from our favorite brands: Chanel, Dior, Estée Lauder and Maybelline. Kiss a piece of paper over and over until the color fades. Reapply if necessary or use a different shade and create layers of multi-colored smooches for your loved one. Finish off by placing your personalized artwork in a frame. P.S.- get creative with a cluster of frames in varying sizes.

DIY Hanging Vase

It’s the time of year where we’re looking forward to endless celebrations with friends and family with thanks filling our hearts. This Thanksgiving, in addition to cooking up a spread of hearty Fall dishes for the table, spread creativity throughout the house that will last longer than those leftovers! Your local flea market likely has a bounty of vintage bottles in various shapes, colors, and sizes. Hang them up with luxe chain and add an array of delicate flowers to create decorative vases that add unique style and cheer to any space. 
 
To create: Tear a piece of gold duck-tape long enough to wrap around the neck of the bottle. Adjust gold chain to your desired length and tape on both sides of the bottle. Snip the excess chain off. Hang the vase on a branch and add some flowers for a finishing touch.

It’s the time of year where we’re looking forward to endless celebrations with friends and family with thanks filling our hearts. This Thanksgiving, in addition to cooking up a spread of hearty Fall dishes for the table, spread creativity throughout the house that will last longer than those leftovers! Your local flea market likely has a bounty of vintage bottles in various shapes, colors, and sizes. Hang them up with luxe chain and add an array of delicate flowers to create decorative vases that add unique style and cheer to any space.

To create: Tear a piece of gold duck-tape long enough to wrap around the neck of the bottle. Adjust gold chain to your desired length and tape on both sides of the bottle. Snip the excess chain off. Hang the vase on a branch and add some flowers for a finishing touch.

DIY AND DECOR - THE GREAT DI(-Y)VIDE

I gotta tell y’all, the D.I.Y blogosphere is indeed where the magic happens! The round-up of ideas in this post aims to prove my case by gathering of bunch of projects that I refer to as 2-in-1 magic makeovers. The featured projects shows how to make the most out of less (with a little help from a circular saw!). With a little luck, this boost of creative split vision might make ignite a lil’ spark of inspiration and make you think twice about tossing that odd old table in the attic/basement/garage. The projects may be double the trouble but they’re most definitely twice the fun, Enjoy!

Home Decor Ideas - TOP 15 PALLET BED HACKS


In order to make the palette of pallet home ideas complete, I figured I should write a feature on Pallet Bed Ideas. Pallet bed hacks are perhaps the most straightforward ones…All you need for some D.I.Y action are some pallets, some paint and a mattress. Wheels are cool, but not necessary. Here are some inspirational pics of the best pallet beds on the web to get you going with your Pallet Bed and Pallet Bed Board Hacks…As always, simple pallet designs leave finishing touches up to you!

Home Decor DIY TOP-15 PALLET SOFA IDEAS


I find it really fascinating that something as standardized as a shipping pallet can rock so many varying looks simply depending on the finishing touches! Whatever your style preferences, rest assured – you can create a pallet sofa to suit your very own aesthetic and functional needs.
All you need for cosiness on a budget are some pallets, a dash of paint, some wheels/furniture legs and to top it off with mattresses & cushions! Here are some nuggets of pallet sofa style inspiration I found on the web – Which look is your favourite?


TOP-10 Home Decor DIY PALLET COFFEE TABLES


Here´s a selection of some pretty neat pallet coffee table hacks I found on the web…To make your own one – follow my 7-step tutorial in the site! I painted my table white – let the pictures inspire some cool customizations – there is a pallet coffee table for every palate – How will you be pimping yours?! (ps. do send me pics of your own D.I.Y Pallet Coffee Table ideas – I´d be happy to post!)

DIY amazing small tree


So for the actual creating of the Thankful Tree…

What you’ll need:
Vase
tree branches
spray paint
scrapbook paper
leaf or circle punch
string
What I love about this project is that it’s as frugal as a DIY project can be since most of the supplies are things that people already have. As for the tree branches, use it as a time to take the kiddos on a walk and go search for some or find some right out of your backyard.
After gathering my tree branches I spray painted them white with some leftover paint I had laying around. If you don’t have any paint it will still look great leaving them with their “natural” look.
For the paper leaves to hang on the tree I had a friend who was kind enough to let me use her Cricut and cut these out on some fall-colored scrapbook paper. If you don’t have an electronic cutter or a friend who has one, using a circle punch would look just as good! Then I added some string to the leaves to hang them on the tree.
Position the branches the way you want in a vase and you’re ready to start thinking of all the things you’re grateful for to fill up that tree!

How To: Make a Glittering Lightscape


For the first two images we have an instructions below.The rest of the photos are just an amazing ideas how to create your own light.


What you’ll need:

One stretched canvas – I used a 22×28 and found it at Michael’s for $14 (on sale)
Acrylic paint (Your choice of color) – I fell in love with Martha Stewart’s “Poodle Skirt Pink” at Michael’s for $2 each. I bought two and used a bottle and a half. I was very excited when I had some left over to use for a future project.
Paint roller – to apply paint on the canvas. I didn’t have one handy so I bought a small one that came with a plastic, reusable, paint tray at Home Depot for $2.
One 100-bulb Christmas light strand – I went to get mine at Michael’s a few days after Christmas for $2.70.
An awl – to poke holes in the canvas for the lights to go through. I didn’t have one nor wanted to pay the money, so I used a small, very sharp knife. It worked just as well.
Super glue – this holds the light bulbs in place. (Otherwise, they poke in different directions and fall out very easily.) I used some that I already had.
My total cost of this project = $22.70
Step One:

Using a pencil, sketch out the design you want on the back of your canvas. The original design asks for each dot to be a half an inch apart – but it’s fine to do a full inch.
I wasn’t super happy with any of my sketches – I redid this about 7 times before I decided to leave it and see what happens. I also drew a line between each dot to connect them. That way, when I went back through with the lights, I could remember where to go next. After a bundle of dots I also wrote the number of how many I used – this helped me keep track of how many I had left.

Step Two:

Paint the front of your canvas. And don’t forget to paint the sides of it, as well. I did two full coats of paint with a thin layer on top to smooth things out. (And to use the remaining paint I had poured into the tray.)


Step Three:

Start making the holes for the Christmas lights. (Glue them along the way so you don’t have to go back and redo the whole process)
Step Four:


Repeat the hole – glue – poke process of each light until you’re finished! Then, you can plug it in and hang it up!
The Finished Product:

It didn’t turn out how I wanted it. It’s surprising how different it looks from the sketch to when the lights are in it and turned on. I wished I went back to re-sketch my design for the 8th time, but it’s okay. Once I put it up and placed my previously owned butterfly lights around it, I love it. I put it on the top of my bookshelf and I love the glow it creates in my room.


If I were to make this again, I would buy three small square canvases and use 50-bulb lights (maybe battery powered?) and hang them in a row. Three clusters of lights!